

Lead Provider of Environmental Test Chamber


 Posted on
16 10 2025
Posted on
16 10 2025


In industries where metal parts face harsh conditions, salt spray testing stands out as a key way to check corrosion resistance. This method puts coatings and materials through a simulated salty environment to see how they hold up. If you’re in manufacturing, automotive, or electronics, getting reliable results from these tests can save time and money. But small mistakes can throw off the whole process. This post shares straightforward advice to help you get the best outcomes. We’ll cover setup, running the test, and common pitfalls, all drawn from real-world experience in the field.
Salt spray testing mimics coastal or industrial atmospheres where salt can speed up rust and wear. It’s a standard check for paints, platings, and other protective layers on metals.
You run salt spray tests to predict how long a product will last in tough spots. Think about car parts exposed to road salt or electronics near the sea. Good results mean your items meet quality standards and customer needs. Poor ones? They signal weak spots early, before products hit the market.
The test works by spraying a fine mist of salt water inside a closed chamber. Samples sit there for hours or days. Afterward, you look for signs like rust or blistering. Standards like ASTM B117 guide the process, setting rules for salt mix, temperature, and fog density.
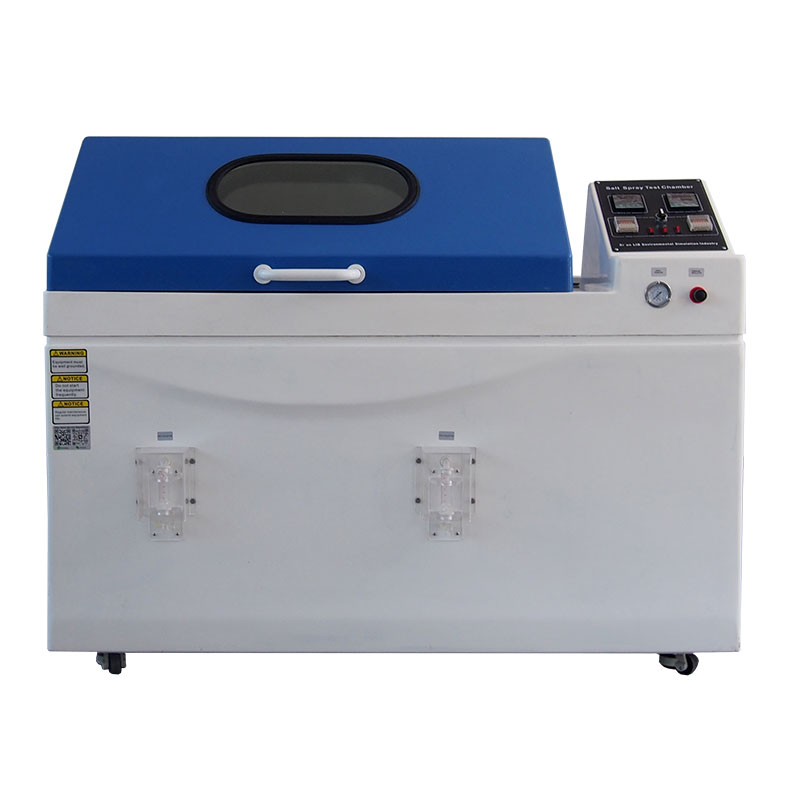
Start with the chamber itself. It needs to create even fog without drips or uneven spots. Temperature usually stays at 35°C for neutral tests. The salt solution? Often 5% sodium chloride in water. Mix it fresh to avoid impurities.
Don’t skip calibration. Check sensors for temperature and humidity. A slight drift can change everything. Regular checks keep data trustworthy.
Prep work makes a big difference. Clean samples well to remove oils or dirt that could skew findings.
Wash parts with a mild soap, then rinse with clean water. Dry them completely. Wear gloves to avoid fingerprints—oils from skin can block the salt mist.
Position samples at an angle, usually 15-30 degrees, so fog settles evenly. Space them out; crowding leads to uneven exposure.
Test times vary by material. Some run 24 hours; others go for weeks. Match the length to your industry’s norms. For example, automotive parts might need longer runs than simple hardware.
Track progress without opening the door too often. Each peek lets in air that disrupts the environment.
Once set up, focus on steady operation. Interruptions hurt consistency.
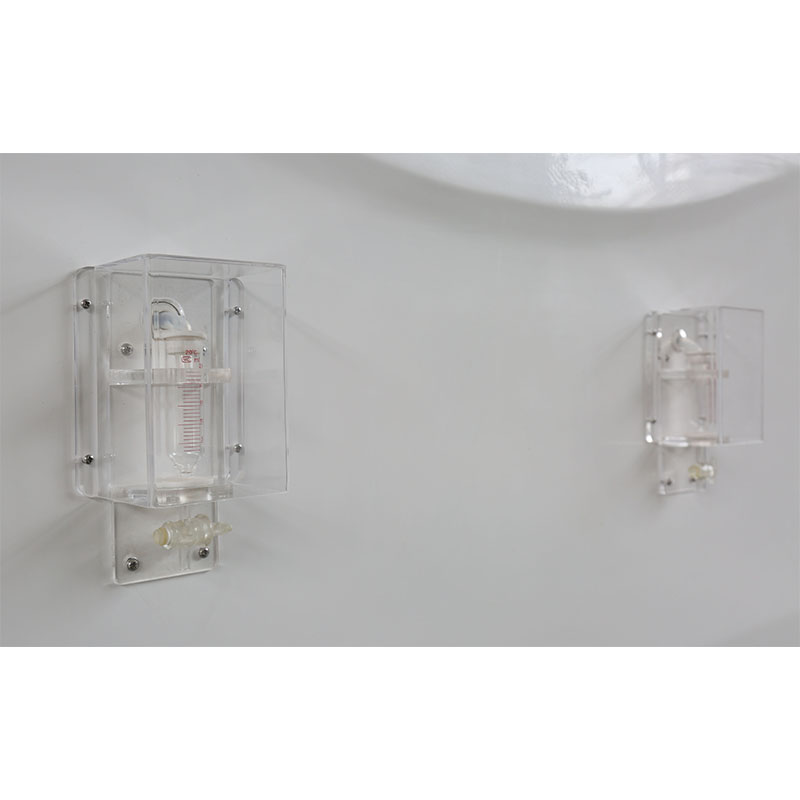
Fog collection matters. Aim for 1-2 ml per hour over 80 cm². Use collectors inside to measure this. If it’s low, check the air pressure or nozzle.
Nozzles clog easily. Blow them out with compressed air before starting. During long tests, inspect them daily.
For neutral tests, pH should sit between 6.5 and 7.2. Test the solution daily. If it’s off, adjust with acid or base. Wrong pH speeds up or slows corrosion unnaturally.
Use distilled water for the mix. Tap water brings minerals that mess with results.
Run the test non-stop. Chambers with large reservoirs help here—they hold enough solution for days. If you must stop, note it in records; it could explain odd findings.
Watch for leaks or buildup. Clean vents and seals regularly to keep air flowing right.
Good records turn tests into useful insights. Note everything.
Log temperature, fog rate, and pH at set times. Use charts or software for trends.
Take photos of samples at intervals. Visuals show changes clearly.
After the test, rinse samples gently to stop corrosion. Dry them, then inspect under light. Look for red rust, white corrosion, or coating failure.
Rate findings against standards. A scale from 0-10 often works, with 10 being no damage.
If results surprise you, recheck setup. Maybe the fog was uneven.
Problems crop up. Here’s how to fix them.
This points to poor fog spread. Check nozzle alignment. Or samples might block each other—reposition them.
Low fog? Boost air pressure. High? Lower it. Test in an empty chamber first to dial it in.
Varying solution quality or chamber wear could be the cause. Standardize mixes and maintain equipment.
Use this table for quick fixes:
|
Issue |
Possible Cause |
Quick Fix |
|
Uneven fog |
Clogged nozzle |
Clean with air or replace |
|
Off pH |
Impure water |
Switch to distilled |
|
Short runtime |
Small reservoir |
Refill carefully or upgrade |
|
Sample contamination |
Poor cleaning |
Rethink prep steps |
Consistent tests build trust in your products. They also boost your team’s skills.
Show staff how to set up and monitor. Hands-on practice helps. Share past test stories—what went wrong, what fixed it.
Make salt spray checks part of regular workflows. Use results to tweak coatings or materials. Over time, this lifts product quality.
Customers notice. Reliable items mean fewer returns and stronger reviews. It sets your brand apart in crowded markets.
When it comes to sourcing equipment for these tests, Xi’an LIB Environmental Simulation Industry stands as a trusted name. Based in China, they focus on building chambers that handle corrosion testing with precision. Their lineup covers basic salt spray units to advanced models with programmable controls. With years in the field, they serve global clients in automotive, electronics, and more. They offer custom options, quick shipping, and support like installation and training. Certifications back their quality, making them a go-to for labs and factories needing dependable tools.
Getting the best salt spray test results comes down to careful prep, steady running, and smart fixes. Follow these tips, and you’ll spot issues early, improve products, and meet standards with ease. It not only saves costs but also strengthens your reputation in the industry. Ready to refine your testing? Start with one change today.
Focus on clean samples, even fog, and daily pH checks. Keep the chamber closed during runs to maintain conditions.
Don’t use tap water—go for distilled. Space samples properly and calibrate equipment before each test.
It keeps the environment neutral. Off levels can fake faster or slower corrosion, leading to wrong conclusions.
Yes, clogged nozzles or leaks mess with fog. Clean regularly for consistent performance.
It depends on standards, but match it to your material—24 hours for basics, longer for tough coatings.


 EN
EN


